
Sewology Sunday - Paper Piecing

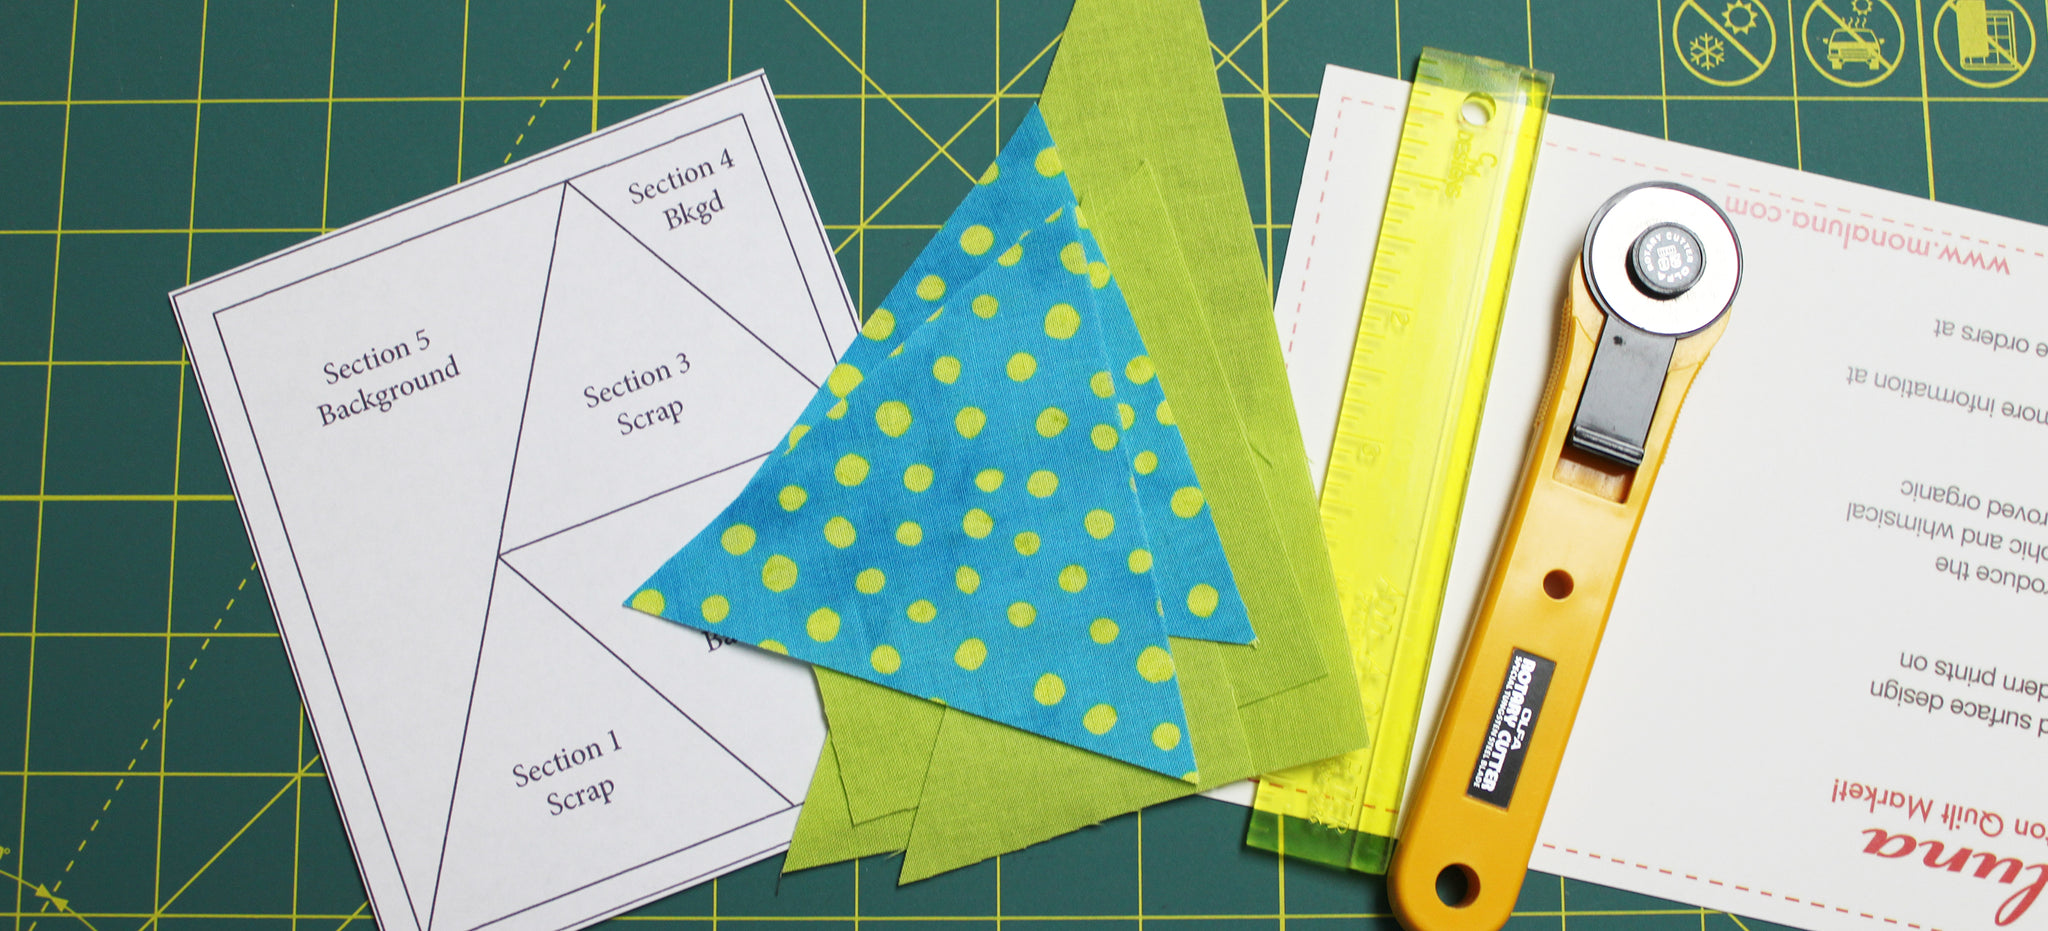
Before you start, you will need to gather:
- an Add-A-Quarter ruler
- template plastic or index card (we use a postcard printed on thick card stock)
- small rotary cutter
- all your paper foundations printed to 100% scale (on the thinnest paper you can find)
- your fabrics cut from the templates provided

Set the stitch length on your sewing machine to 18-20 stitches per inch. On some machines that will be a 1.5. The smaller stitches make it easier to rip off the paper. All right, we are ready to begin! (We are using our Lombard Street pattern as an example in the photos. Lombard Street is coming soon!)
The lines on the Template indicate where to sew and the numbers indicate the sequence in which to sew. The only seam allowances that are shown are the ones that go around the unit. The lines and numbers are printed on the front of the pattern. This is the side to sew on. The back of the pattern is the blank side. This is where the fabric will be placed. Let the paper-piecing begin!
Place fabric 1 right side up on the blank side of the pattern. Turn the foundation pattern over, look through the paper towards your light source and make sure the fabric extends over the lines on each side by at least ¼”. Pin in place.

Place your template plastic or an index card on the sewing line between Section 1 and Section 2.

Fold back the foundation pattern over the edge of the template plastic. You will see the excess fabric from Section 1.

Place the Add-A-Quarter ruler up against the fold of the foundation paper with the lip side down.

Use the rotary cutter to trim the extra fabric from Section 1. You will now have a straight line to help you place fabric 2.

Position Fabric 2 of the pattern on the trimmed edge of Fabric 1 RST.

Turn the foundation paper over and stitch on the line between Section 1 and Section 2. Sew a few stitches before the line begins and a few stitches after the line ends.

Flip the paper over and open Fabric 2. Press.


Comments
Lucille said:
Love what you are doing. Keep it up
Lucille Rypinski
Carol Crisp said:
Thank you so much for posting these very clear and concise tutorials! The photographs are extremely helpful. I plan to refer back to these often.
Sheri said:
Love it . This might be my need favorite quilting not sure yet would love the try my quilt tops doing paper piecing that’s for sure! Love your clear directions on this thank you
Rachael said:
Do you wear out your needle quickly or have to buy a special needle since you are seeing so much on paper? I’ve never quilted using this method but it looks pretty fun!
Gay said:
Love this. Where can I get the template for the block? Thanks.
Mac said:
Have you ever tried Stitich ’n Wash or another type leave in foundation for your “paper Piecing”?
Ashley said:
Thank you for this tutorial! I have never tried paper piecing but now feel like I could probably tackle it. :)
Susan said:
I totally agree with you that most people either love or detest paper piecing. I enjoy the precision of paper piecing. However, I get frustrated with the fabric shifting from where I think it is when I check it and where it actually is when I go to sew it. This is especially true of my first two pieces. I have tried pinning pieces to the paper and with the paper that adds to the inaccuracy of the pinning of the fabrics and still covering the pattern as I envision. Do you have any tips? Does that improve with practice? Thanks for the tutorial. I have always trimmed by sewing line after I stitched it rather than after sewing. This certainly would help to ensure a 1/4" seam allowance – I’ve had times that the seam allowance ended up a tad less and times that I had to “do a do over.”
’
Barbara said:
The tutorial was so concise——-much clearer to me than the instructions in your book——guess that I am a visual person and need to see it as I go. The tutorial made the trimming of each fabric, so you know where to place the next fabric, with so little wastage, so clear. Thank you. My quilt store is using your book, Arcadia Avenue, as a block of the month.
Debbie Sims said:
After making all the Arcadia avenue blocks when do I take off the papers? I am starting to put it together but did not see in book when to take papers off.
Thanks
Kathy said:
Thank you so much for this FANTASTIC tutorial! Honestly, I’ve tried paper piecing a number of times…even took a class, but nothing sank in and I’d always set that project aside (or abandon it). I finally decided to try again and with your instructions…I actually get it and it works, and it’s fun! I feel so much more confident about creating the Arcadia Avenue blocks now! Many many thanks!
Anna said:
I am working on the Arcadia Ave block and I’m having so much trouble with getting the triangle shapes to be where they are suppose to be. Even doing exactly what you say I’m having to rip it out multiple times and sometimes 3-4 times on 1 piece. Can’t figure out what I am doing wrong. Is there a specific way that the pieces need to be placed to get this to work properly. I’ve tried lining up the point that will be going down so they are in a straight line I’ve moved it to the right and to the left and I’ve moved it to where the right side is higher than the left etc. What is an easy way to line them up. Help. Would love to be able to finish this and have done smaller projects before with great success but just can’t figure it out for this one. Any help will be appreciated.